In this post I’ll talk you through the basics of creating a Photoshop Comp and taking it throught to Flash to animate.
Creating the Photoshop Composition
We are going to create a Photoshop composition ‘comp’ that we will import into Adobe Flash Professional to animate.
We are doing to produce an image of a windfarm.
View the Procedure
Select Edit > Preferences > Units and Rulers (Windows) Photoshop > Preferences > Units and Rulers (Mac OS) and in the Units sections change both Rulers and Type to pixels.
Select File > New to create a new comp. Set the width to 960px and height to 300px. The comp will have a layer called ‘layer1’. Double click on this layer and rename it ‘hills’.
Creating the Hills
![]() In the tools panel click the default Foreground and Background colours icon to set the colours to black and white.
In the tools panel click the default Foreground and Background colours icon to set the colours to black and white.
- Choose Filter > Render > Clouds.
- Then Filter > Noise > Add Noise.
- Then Filter > Brush Strokes > Splatter.
- and finally Filter > Blur > Gaussian Blur.
Experiment with these filters until you are happy with the texture. To change the colour add a hue/saturation adjustment layer via Layer > New Adjustment Layer > Hue/Saturation.
In the Adjustments panel select the ‘colorize’ checkbox and then select a green hue. Experiment with the hue, saturation and lightness sliders until you are happy with the colour now applied to the texture.
Ensure you have ‘hills’ layer selected and not the adjustment layer. Use the lasso tool in the toolbar to draw a hillside shape in this layer. The ‘marching ants’ will indicate it is selected. Add a layer mask by clicking on the icon at the bottom of the layer panel.

You could duplicate this layer by dragging the layer down onto the new layer icon at the bottom of the layer panel. We’ll flip this horizontally to achieve a more interesting hillscape. To flip the layer select Edit > Transform > Flip Horizontal.
Move and resize the two layers until you are happy with the hillside you have created.
Before we add a layer for sky we need to refine the adjustment layer that is used to add the colour to the hills. To do so place your cursor between the adjustment layer and the layer itself and ALT click. You will see an icon made up of a black and white overlapped circles.
Adding the sky
Add a new layer with the new layer icon at the bottom of the layer panel.
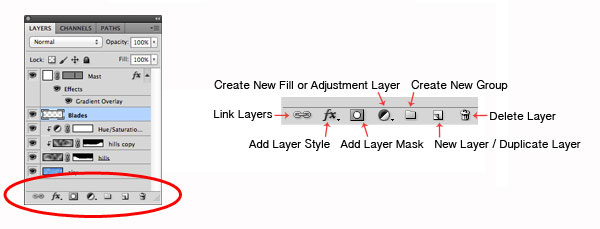
Change the foreground and background colours to different hues of blue. Then use the same clouds filter to add a sky background ie Filter > Render > Clouds.
Creating a windmill
We are doing to create a windfarm ie lots of windmills but we’ll leave the creation of the windfarm to Flash. In Photoshop however we will create one copy of a windmill that will then be ‘cloned’ and animated in Flash.
Here you may choose to use guides to help create the shape of a windmill blade. To create the shape itself use the pen tool. This creates a path. You can see the path in the ‘Paths’ panel – which is a tabbed panel behind layers.
Right click on the path (described as a working path) in the path panel and choose Make Selection. Return to the layer panel and you will see that the marching ants are now following the outline of your path. We will now fill this shape with a gradient colour. To do so use select the gradient tool from the toolbar and then a white/black gradient from the options bar.

Use the crosshair to create a gradient effect by dragging. Experiment until you have created a shadow gradient effect that you think works well.
You may want to resize the blade. Use Control T Windows/ CMD T MAC to break up transform handlers around your blade shape. Resize until you are happy with the shape. Drag the original blade onto the new layer icon to duplicate.

With the duplicated version of the blade still selected for transformation use the option bar to set a rotation value of 120°. Repeat the duplication and transformation process until you have 3 blades positioned as followed.
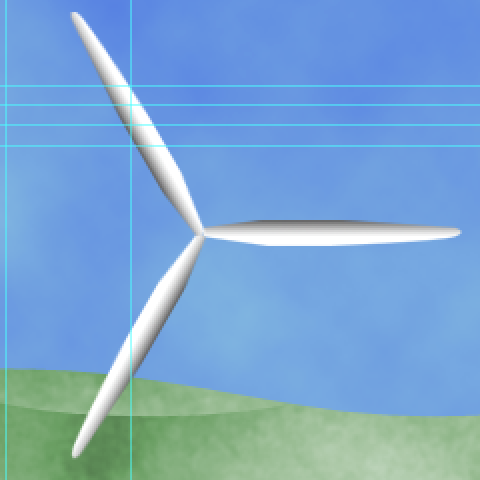
Tip: When duplicated and rotating the blades ensure they stay within the canvas otherwise they will be cropped when moved. Now we will create a mast for our windmill.
To do so we will use a vector shape. Select the Polygon Tool from the Tool bar. In the Options bar enter a value of 3 for the number of sides. With white as your foreground colour draw a triangle. This wil automatically get added to a new layer. This doesn’t look very much like a windmill mast so now use the transform tool Control T Windows / CMD T MAC to squash and stretch your triangle until it resembles a mast. Once you are happy with the shape select the Add Layer Style button on the bottom of the Layers panel and choose ‘Gradient Overlay’.
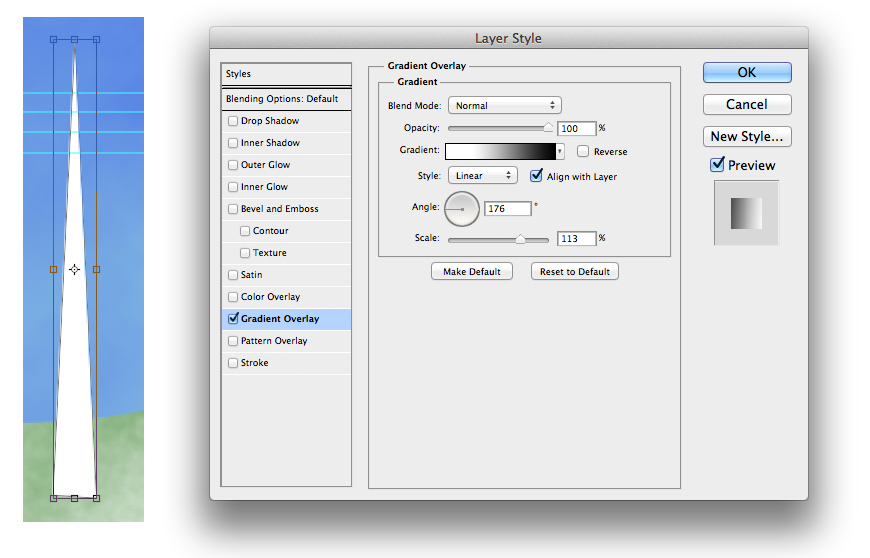
Experiment with the gradient setting to give more depth to your mast. On the duplicated layer use Control T Windows/ CMD T MAC to show the transform handlers. The transformation point that is used to rotate the blade needs placing at the axis. To do so use hold down ALT and drag the transformation point so it is positioned centre left as follows:
Your composition should now look something like this.

Before moving into Flash it will pay dividends to ensure that you have named all your layers appropriately. I would also at this stage merge the windmill blade layers into one layer called ‘blades’. To do so select the layers with the three blades on and right-click and select ‘merge layers’.
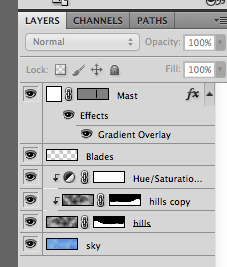
Tip: Use the eye icon in the layers panel to toggle layers on/off to ensure everything is named correctly.
Save your Photoshop file as a PSD.
Importing the Photoshop Comp into Flash
With the Photoshop composition ‘comp’ complete we will now move into Adobe Flash Professional. Create a new Actionscript 3.0 file.
Import Settings
Select File > Import > Import to Stage and browse to locate your PSD file. The following dialog box should now appear. Notice how all the layer names you used in the Photoshop composition are carried across into Flash. Flash wants to bring all the content in as Bitmaps but we’ll tweak the settings a little. Select the Mast layer. You will now be offered the opportunity to import the layer as a MovieClip.
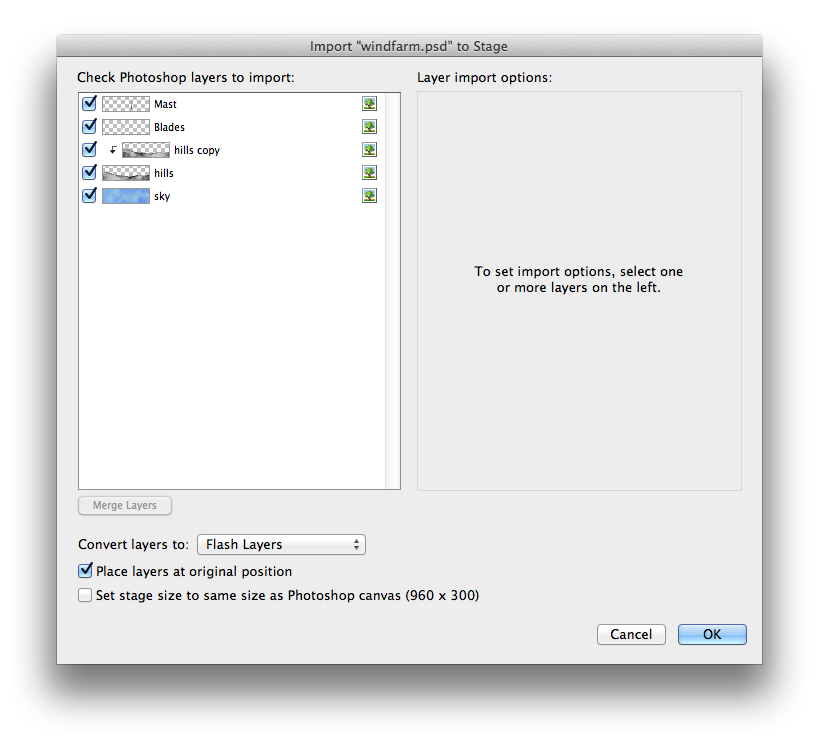
Select ‘Create MovieClip for this layer’. Do the same for the ‘Blades’ layer. The other layers we can leave as Bitmaps. This dialog box also allows you to set the stage size in Flash to match that of the Photoshop canvas, That is a great time saver so ensure you check the option to do so before leaving this dialog box. Once the PSD is imported Flash will create layers and library items for the elements of the PSD.
Creating the Windmill MovieClip
Identify and select the blades and mast layer. Then select Modify > Convert to Symbol. Give the symbol a name of ‘Windmill’ and choose the MovieClip symbol type. In the Library Panel in Flash you will now have a movieClip called ‘Windmill’.
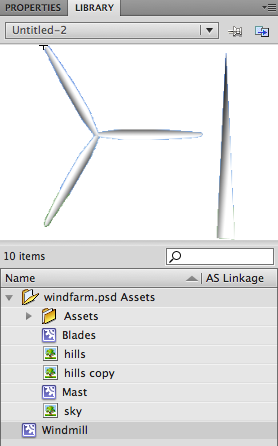
Double click on the MovieClip’s blue icon in the Library Panel to edit it (or right-click on the MovieClip in the Library Panel and choose Edit). You should now be in Symbol Edit Mode where the symbol is isolated for editing. Both the mast and the blades are on the same layer. This is no good for tweening they need to be on separate layers. Select both objects (mast and blades) and then choose Modify > Timeline > Distribute to Layers.
This will place the mast and blades symbols on separate layers named appropriately.
Reposition the layers to create a windmill and then in the blades layer right-click over the blades movieClip and choose Motion Tween. In the Properties inspector sent the rotation value of the motion tween to 1. Ensure the mast layer has the same length of timeline by adding a simple frame to match the 24 frames of the blades layer. Use the breadcrumb to return to the Flash stage. You could now add multiple windmills to your Movie and resize and reposition to create your windfarm.