Image File Formats
There are three main types of image available to include in a web site:
GIF files (graphics interchange format) – An image format limited to 256 colours. Therefore GIFs are most useful for images with few colours or large areas of flat colours such as company logos, maps or charts. GIF files do support transparency but only one colour can be transparent. Becoming less popular with the rise of the PNG (see below).
JPEG (Joint Photographic Experts Group) – You may be familiar with this format through digital photography as most digital cameras will save to this file format. JPEG files can be saved using a huge amount of different colours therefore making them ideal for photographs. JPEG do not support transparency.
PNG (Portable Network Graphic) – The newest format to emerge. Supports more than 256 colours and also multi-colour transparency.
All three formats can be read and exported from both Adobe Photoshop and Adobe Fireworks.
Tip: Adobe Fireworks saves files as ‘Fireworks PNG’s. These are slightly different files to ‘normal’ PNG files as they contain additional information required by Fireworks. The type of PNG used on a web page is usually an optimized version known as a PNG8.
If you are producing your own files, the decision on which type of image you decide to use depends on the nature of the picture you are using. For pictures that are more like photos, you will probably use a JPEG image. For pictures that are more like computer graphics with slabs of colour, you will probably use a GIF image. If you need multi-colour transparency then a PNG is required.
There are two issues to consider – size of the image file and faithful reproduction of the original image. If in doubt as to which type of image to produce, try producing all three, and look at:
- how each image appears on screen when you open it
- the size of the file (in general, the smaller the better).
Inserting Images
When you insert an image into a HTML page you in effect make a ‘window’ through to the image. The image is not embedded into the page as it would be in some desk top publishing applications. What the HTML adds is really like a hyperlink to the image.
Therefore, the same issues regarding absolute and relative paths apply to inserting images. In reality most of your paths to images will be relative as you should only use images on your web site which you have control and copyright over.
- Move the cursor to the point in the file where you want to insert the image;
- pick the Image icon from the Common Insert bar or select Insert > Image then browse to find the image file you wish to insert;
- The Image Tag Accessibility Attributes dialog box will open. In the ‘Alternate text’ box enter text to describe your image.
- the image appears in the document window. Highlighting the image will change the Properties Inspector to show the Image Properties.
Tip: You can also drag an image file from the File panel into the document window to insert it.
Image Alternate Text
In the above example you enter ‘alternative text’ (often given the shorthand ALT text). This is an important feature for improving accessibility. The alt attribute of the <img> tag provides a text alternative for people using screen reading software. This is therefore important for increasing the accessibility of your web pages to the visually impaired. In addition the value entered will be seen while the image loads from the Internet or if a user has turned off the automatic loading of images in their browser. In older browsers the text alt will appear when the cursor is over the image.
Dreamweaver will force you to enter ALT text for images that you insert. This forces you into good practice. You can however choose to remove this setting.
- Open preferences by selecting Edit > Preferences.
- Choose Accessibility from the categories on the left hand side.
- Uncheck Images from the ‘Show Attributes when inserting’ list.
Tip: If you use ALT text you not only make your pages more accessible but you can use them to improve your search engine ranking by placing keywords in your image ALT text.
Image Properties
Key features of the Image Properties box are:
Dimensions – Whatever graphics package is used to create the image it is created with a specific width and height in pixels. These are included in the HTML <img> tag as attributes to speed up page download. Dreamweaver will automatically add the correct values. However, the image file can be resized in the document window. This will distort the image and is not normally recommended. To reset the image to its correct dimensions click the refresh icon that now appears to the right of the image dimensions. Dimensions appear bold when then differ from the source image dimensions.
Src – This is the source of the image. This is usually a relative path.
Text Alternative – ALT text as described above.
Link – Images can be made links in the same fashion as text. Browse or use the Point to File icon to choose a file to link to.
Edit – Use to edit the image in your chosen image editor. The ‘Edit Image Settings’ option allows you to optimize the image for web use.
Original – If you created the image file in Photoshop or Fireworks and imported it into Dreamweaver you will see the original file ie a PSD for Photoshop or a PNG for Fireworks. Use the Edit button to open either Photoshop or Fireworks to edit the original.
Border* – Places a border around an image. Assumes the default text colour of the document. Values are in pixels. Enter ‘0’ to completely remove any border.
V Space* – Adds vertical whitespace to the top and bottom of the image. Values in pixels.
H Space* – Adds horizontal whitespace to the left and right of the image. Values in pixels.
Align * – Aligns the image to the left (default), right or centre of the page. The value chosen places dictates how text will appear in relation to an image. For example, select right to place the image on the right hand side of the page with text to the left. These options are best illustrated by placing one line of text such as a caption next to an image. For example the tree image below has a value of absolute middle set. Therefore the text is aligned to the absolute middle of the image.
Properties marked * can be applied more efficiently using CSS (Cascading Stylesheets).
Image Editing via Dreamweaver
Although Dreamweaver integrates nicely with Adobe Fireworks and Photoshop it also allows you to directly edit image files without the use of an external graphics package.
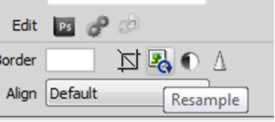
Image Resampling – adds or subtracts pixels from a resized image files to match the appearance of the original image as closely as possible. Resampling an image reduces an images file size, resulting in improved download performance. You will only really benefit from resampling if you scale an image down. If the image dimensions appear bold then the image HTML differs in dimensions from the actual source image and you therefore may benefit from resampling your image (especially when reducing image size).
Cropping – lets you edit images by reducing the area of the image.
Brightness/Contrast – modifies the contrast or brightness of pixels in an image that may be too dark or too light.
Sharpening – adjusts the focus of an image. Can be used to increase edge contrast, making the image appear sharper.
Warning: When these options are used the graphic file is changed. Be careful in your use of these options. It is recommended that you take a back up of your image file before editing it.
Warning: When these options are used the graphic file is changed. Be careful in your use of these options. It is recommended that you take a back up of your image file before editing it.
Image Preview Dialog Box
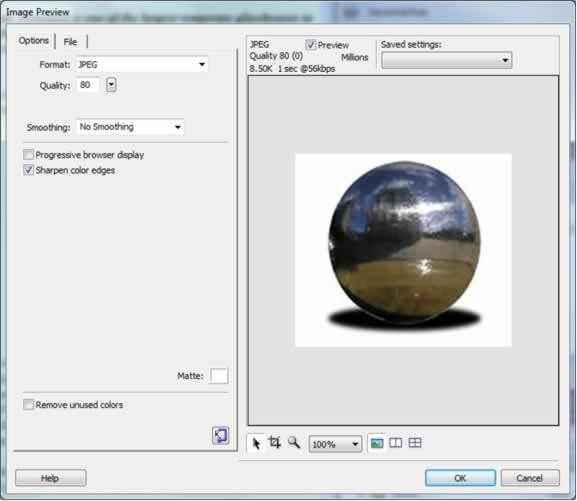
Use the Edit Image Settings icon to open the Image Preview Dialog box. Here you can edit the image file resizing/cropping it and changing the file type and quality.
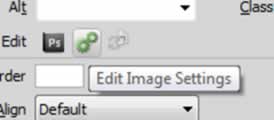
The Image Preview is excellent for scaling images down to a decent size for use on your web page.
Editing Outside Dreamweaver
You can choose to edit your images in any image editing software but is recommended that you use either Fireworks or Photoshop (or both). In Dreamweaver’s preferences you can associate different image file types with different image editing software.
- To do so select Edit > Preferences, choose the ‘Files Types / Editors’ category and locate GIF, JPEG and PNG as appropriate.
Whether you amend the preferences or not Dreamweaver has integration features with both sister packages Fireworks and Photoshop.
Integration with Fireworks CS5
Fireworks CS5 is an image editing application that has a specific focus on web design and like Dreamweaver goes back to the old Macromedia days. As such the pair have been together a long time and work very well together. You can cut and paste whole images or parts of an image directly from Fireworks into Dreamweaver. When you do so the ‘Image Preview’ dialog box automatically opens where you can choose the file type you wish to insert into Dreamweaver.
Use the icons at the bottom right hand side to preview more than one version of the image to ensure you get the best mix of quality / file size.
Note: If you want to use a PNG in your page remember to import the image in such a way as to preserve the original Fireworks PNG file. One technique is to simply change the image name on import.
You can also insert an image that has been exported from Fireworks as either a JPG, GIF or PNG and Dreamweaver will automatically populate the ‘original’ value in the property inspector. As such you can then use the ‘edit’ button to jump straight into Fireworks in order to edit your original file.
When you finished editing the image ensure that the optimize settings in Fireworks match the type of image you wish to publish ie – GIF, JPG or PNG. If you happen to require a PNG in your Dreamweaver page then ensure you have saved your ‘Fireworks PNG’ with a different name otherwise your image will be flattened – that is will not be as easily editable. The optimize panel in Fireworks is found by selecting Window > Optimize.
When you have chosen the image format you wish to export, then simply click on the ‘Done’ button in Fireworks to return to Dreamweaver.

Next time you edit this image Dreamweaver and Fireworks will remember all your settings. You should also see a second ‘src’ property in the property inspector that now references the ‘master’ file used to create your image.
Tip: When you edit a file in Fireworks for the first time is a good idea to save a backup ‘master’ copy that you can return to and edit again later. When you do so Fireworks will save the file as a PNG. Remember Fireworks uses the PNG format as its native format – don’t forget these are a special variety of PNGs called ‘Fireworks PNGs’.
Integration with Photoshop CS5
Dreamweaver CS5 integrates with Adobe Photoshop CS5 – the Rolls Royce of photographic editors.
You can choose to insert a PSD file into your Dreamweaver document. When you do so the ‘Image Preview’ dialog box will open.
The ‘Options’ tab allows you to choose which format you would like to import the image in (PSD’s themselves cannot be used in a web page). The PSD can be converted to a web ready image in GIF, JPEG, or PNG formats.
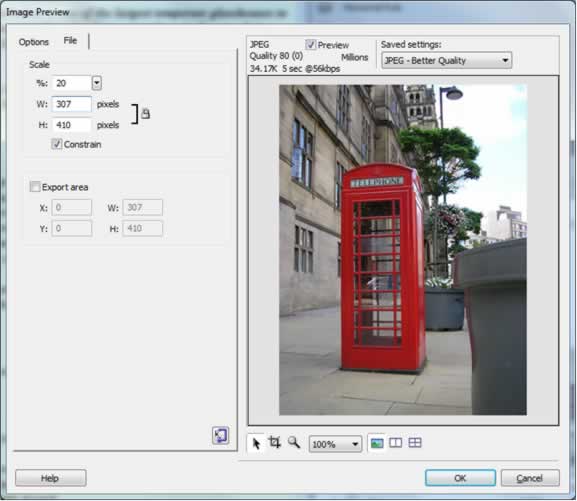
The ‘File’ tab allows you to resize the image and crop the image. This is particularly useful when using digital photographs that tend to be too large for the web in their initial unedited state. The above shows an image of dimensions 1536 x 2048 that has been resized to 307 x 410 to be used on a web page.
When you have selected the appropriate options then Dreamweaver will prompt you to save the new file that is created. The original PSD is left intact.
As with Fireworks, the property inspector will now indicate the ‘master’ file (in this case a PSD) that was used to create the image. This will appear in the ‘original’ property.
Editing Images in Photoshop
If you select the ‘edit’ option from the property inspector you will now be returned to Photoshop and the PSD from which the image originated.
You can then edit and save the file as a PSD in Photoshop. When you return to Dreamweaver the image will now appear with an icon showing one green arrow and one red arrow in the top left hand corner.
This shows that Dreamweaver knows that the original PSD file has been changed and is a prompt to refresh the image.
When you right-click on the image an option to ‘Update from Original’ is listed.
Select this and the changes to the PSD are now reflected in the image.
The icon is now amended to show two green arrows indicating that the image is now synchronized.
Cutting and Pasting From Photoshop
You do not have to use the full PSD image. Dreamweaver will also allow you to copy in just slices or layers from Photoshop.
- Copy all or part of a single layer by using the Marquee tool to select the portion you want to copy, and then choose Edit > Copy. This copies only the active layer for the selected area into the clipboard. If you have layer-based effects, they are not copied.
- Copy and merge multiple layers by using the Marquee tool to select the portion you want to copy, and then choose Edit > Copy Merged. This flattens and copies all the selected area’s active and lower layers into the clipboard. If you have layer-based effects associated with any of these layers, they are copied.
- Copy a slice by using the Slice Select tool to select the slice, and then choose Edit > Copy. This flattens and copies all the slice’s active and lower layers into the clipboard.
Background Images
Background images can be added to a web page to make it more visually interesting. As with the other images on a web page you can only use images in GIF, JPEG or PNG format.
To insert a background image:
- Select Modify > Page Properties or right-click anywhere in the document window and select Page Properties.
- In the Page Properties dialog box choose an image to use as your background image.
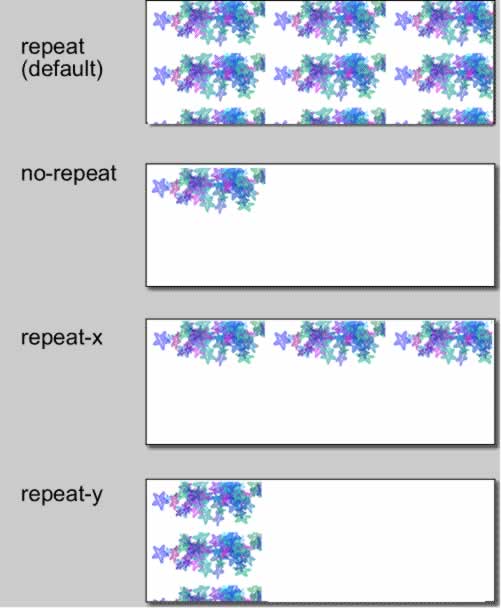
By default a background image will ‘tile’ across the back of the document. If you don’t want that effect then you can use the ‘Repeat’ option in Page Properties to set the image to:
- no-repeat – image only used once and therefore will not tile
- repeat – the default with tiling
- repeat-x – repeats the image along the x-axis that is horizontally across the page
- repeat-y – repeats the image along the y-axis that is vertically down the page
Further customization of the background image is possible through manipulating the style sheet that is used to add the background.
- Select Window > CSS Styles. The Style panel will open on the right hand side. You will notice that the <body> is listed in the style panel.
- Double click on ‘body’ and the ‘CSS Rule Definition Box for body’ will open.
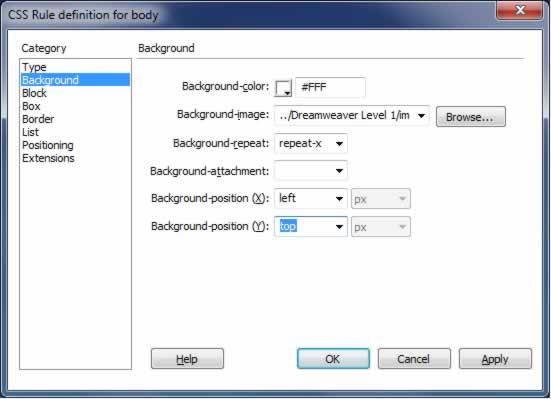
- Select the ‘Background Category’. You will see the details you entered through Page Properties listed but you now have 3 additional options:
- background-attachment – will cement / stick the image to the page such that if the page has enough content to scroll the image remains fixed.
- background-position (X) – used to place the background image horizontally (particularly useful if you have chosen no-repeat).
- background-position (Y) – same as above but vertical positioning.
Image Maps
Making an image a link is as straight-forward as highlighting the image and then adding the link. Images can however be also used to make more sophisticated links called image maps. This is a technique which divides an image up into a series of hotspots each one of which can link to a different web page.
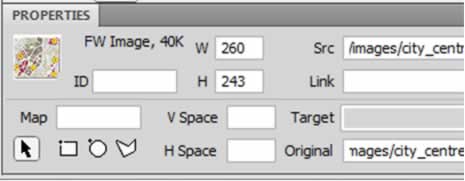
To add an image map:
- Select an image in your document.
- In the Properties Inspector select either the rectangle, circle or polygon hotspot tool.
- Use this tool to draw a shape around the area of the image you wish to use as a hotspot.
- When you create hotspots the Properties Inspector will change to reveal hotspot properties.

- This is where you can add links to your hotspots. You can also target links (ie _blank to open in a new browser window) and add different ALT settings for each hotspot.
Note: Hotspots can be edited by selecting them with the Pointer Hotspot Tool – the cursor icon on the Properties Inspector.