Formatting the Page – CSS and HTML
When creating and formatting a web page you will use a blend of HTML and CSS. What is the difference? HTML (HyperText Markup Language) is the core language of the web and is used to structure you document. For example it is used to divide the document into headings and paragraphs, it is used to add bulleted lists and it is used to add elements such as images and links. CSS (Cascading Style Sheets) are used in conjunction with HTML. CSS is used to format your document in terms of colour schemes, fonts and font sizes. It can also be used to create pages layouts (known as CSS-P). This all sounds terribly complicated but the good news is that Dreamweaver CS5 will write all this code for you.
Formatting Text with the Property Inspector
Text can be easily formatting in Dreamweaver using the Properties Inspector. In the HTML mode the Properties Inspector has commonly recognised icons for making text bold, italic and for changing the justification. It is also used to set paragraph formatting.
Paragraph Formatting – HTML Mode
There are a number of HTML tags that will define the format of a paragraph. The Paragraph option simply adds a <p> and a <p> around the text. This ensures that there are empty lines above and below the text. If you press Return this is the paragraph formating assumed by Dreamweaver. Notice the <p> appears in the Tag Selector in the bottom left-hand side of the document window.
Other options include Heading 1 through to 6. These add the HTML tags <h1> to <h6>. Heading Style One <h1> emboldens the text, makes it larger and adds a space below the heading. The other five heading styles do exactly the same but decrease in size with <h6> the smallest.
Tip: Try and use the semantic H1 to H6 headings for your documents. They may look dull but they are particularly useful for search engines to identify the important bits of a document. We can make them look more interesting later. The study of semantics is the study of meaning. So by semantic we mean that as far as possible, the tags surrounding the content of a document should describe the meaning/purpose of that content.
Font Face – CSS Mode
Switching the Properties Inspector to CSS mode the font face can be selected from a drop-down list. The list includes groups of fonts such as Verdana, Arial, Helvetica. For a font to be displayed it must be loaded on the machine displaying the page. As a web designer you cannot pick a font and guarantee that that font is available on other machines. If the font you choose from your machine is not available on someone’s machine who is viewing your page then a default font is applied over which you have no control.
These lists indicate the hierarchy of fonts to be used by the browser when displaying the page – ie if the user’s computer has Verdana then use that, else use Arial. If they do not have Verdana or Arial then use Helvetica. This is one way the designer can try and achieve some consistency of experience for different users of the site.
You can put together your own combinations of fonts using the Edit Font List option from the drop down list in the Font Face box. Alternatively select Format > Font > Edit Font List.
Tip: Try and use sans-serif fonts like Arial and Verdana. These are generally regarded as easier to read on a computer screen than serif fonts such as Times New Roman.
Font Size – CSS Mode
Defines the size of the text. You can choose a specific size by selecting the number and the unit of measurement.
You are presented with unit measurements such as pixels, percentage, ems, inches, centimetres, points and picas (there are 12 points in a pica and 6 picas in an inch – and therefore 72 points in an inch!).
Which unit measurement should to use?
This is an example of a classic ‘depends’ answer. Some designers like to use relative units of measurement such as percentage and ems. This is because the user can then resize the text to aid with accessibility. However, most modern browsers now have a zoom facility that allows both text and images to be zoomed. In this case absolute values in pixels are zoomable as well so negating the need to use ‘relative’ units of measurement. Both approaches are used so it is up to you to make an informed decision. Having said that falling off the fence – I would use opt for setting font size in pixels.
ems – is a unit of measurement based on the width of the letter “m” in the default font. Setting a value of 1em uses the default size. Decimal places above and below this give you larger and smaller fonts respectively ie 1.4em and 0.6em. Don’t try values such as 12 ems as it will be massive! ems are a relative unit
Font Colour – CSS Mode
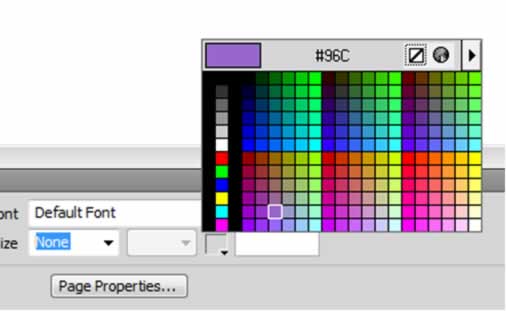
In Dreamweaver you will have lots of opportunities to set colours. They are usually picked through colour wells. These set ‘hexadecimal’ colours.
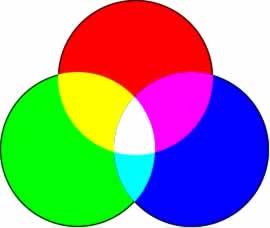
In web design colours are generally designated with hexadecimal codes. Hexadecimal colours are made up of a mix of red, green and blue.

Each of these core colours can be any value between 0-255 (ie one of 256 values). As hexadecimal colours only use two characters to set each colour value they do so using base 16.
That is the values range from 0 1 2 3 4 5 6 7 8 9 A B C D E F. A hexidecimal colour is written as follows:

Therefore, “#FF0000” has red with the highest value possible and both green and blue with the lowest possible values. This would then display pure red.
As each of the six characters can be any value from 0-F. There are therefore 16 to the power of 6 colours to pick from. That is equal to 16 million colours.
Web Safe Palette
Any of these 16 million colours can be used. Plenty of choice. However by default Dreamweaver offers you a limit choice of only 216 colours.

These are the colours that make up the ‘web safe palette’. In the 1990s when hardware was more limited it was found that these 216 colours worked consistently across different platforms However, as hardware has improved, it is really only necessary to limit yourself to these colours if you are concerned that your web design work will be viewed from a 256 colour (8-bit) computer system. To use other colours select the colour picker.
In the colour picker mix your own colour. Notice how Dreamweaver calculates the hexadecimal value for the colour for you.
• See http://www.lynda.com/hex.html for more information on the web safe palette.
Tip: If all that maths seems a little frightening bare in mind that you can simply use the eye dropper to select colours from images that you have used in your web pages. This is a great way to come up with nice colour schemes. To do so click in a colour well but wander away from the colour palette with your cursor and use the eye dropper to pick a colour.
Kuler
Kuler is a free online service from Adobe for selecting a colour scheme. You can use those added by others or create your own. Visit http://kuler.adobe.com/ to be inspired.
Lists – HTML Mode
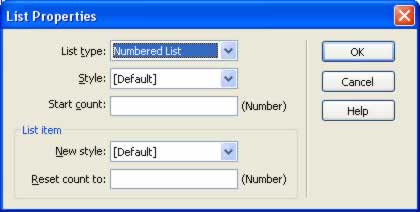
Bullet point (unordered) and numbered (ordered) lists can be added using the icons on the Property Inspector. The format of these lists can be edited by selecting the List Item button on the Property Inspector. (If you cannot see this button, then expand the Property Inspector by clicking on the white arrow in the bottom right-hand corner). The List Properties dialog box appears as follows:

The list style can be changed for example to use Roman numerals for and ordered list.
Indent Text – HTML Mode
The tab button does not work in Dreamweaver as there is no real equivalent in HTML. Use the indent option on the Property Inspector if necessary. Notice that when this option is applied to part of the text in an ordered or unordered list then a nested list is produced.
Non-Breaking Space
Just as the tab button does not work in Dreamweaver notice that tapping the space bar does not add white space to the page layout. In order to do so a non-breaking space character needs to be added. This is done by selecting Insert > HTML > Special Characters > Non-Breaking Space. This is represented by in the HTML. Alternatively you can enable consecutive spaces in preferences. Choose Edit > Preferences and select Allow Multiple Consecutive Spaces. However it is not consider best practice to do this as they are more subtle ways of improving page layout.
Line Breaks
Remember a carriage return/Enter will place a paragraph break into the document. Use Shift > Return for a line break or select Insert > HTML > Special Characters > Line Break.
Testing Pages
Although Dreamweaver is a WYSIWYG application you should regularly test your page design by viewing through the web browser.
To preview files in the web browser press F12 (PC) or use the Preview icon on the Document toolbar.
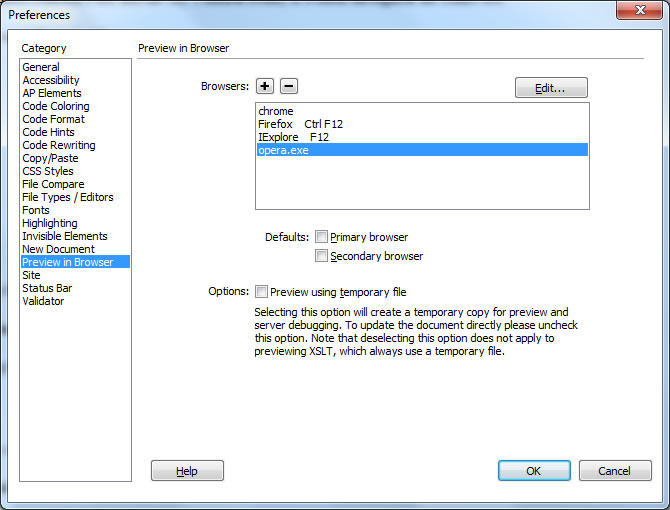
This will preview your page in the default browser. To add another browser or change the default browser select File > Preview in Browser > Edit Browser List. This opens the Preferences dialog box.

Additional browsers can be added by using the Edit button. You can allocate ‘Primary’ and ‘Secondary’ status to two of your browsers. The browser you identify as ‘Primary’ is then associated with the F12 shortcut key. Your ‘Secondary’ browser is launched by pressing Control F12.
You can also launch a browser for previewing by using the Preview icon on the document tool bar.
When using the preview feature, by default Dreamweaver will prompt you to save the file, if it remains unsaved.
Tip: An asterisk against the file name in the file tab indicates that a document has unsaved changes.
In Preview in Browser preferences you can choose to use temporary files for previewing that will mean that you will not be prompted to save the file when pressing F12.
Warning: It is recommended that you use the default Preview in Browser mode rather than using temporary files. The temporary files can prove distracting – if not confusing – and there is nothing wrong with continually saving your work! Stick to the default.
Previewing with Live View and Live Code
Dreamweaver CS5 also has a feature called Live View. This is actually a browser built into Dreamweaver.

Select Live View on the Document toolbar. You are now in Live View. Notice the refresh button and the navigation buttons that are available. Use Control > Click to follow links.
Coders will also love the ability to use Live Code. Here you can see the same HTML that the browser would see. When in Live Code the code is highlighted in yellow.
When in Live View the Properties Inspector and other features are disabled because you cannot edit the document in this mode. Toggle the Live View button to exit Live View.
Warning: If you cannot seem to edit your file, check to see if you are still in Live View. If you are then exit Live View!